Oh boy, the Fourth of July! It’s one of my absolute favorite holidays because it just screams summer fun, fireworks, and of course, FOOD! If you’re anything like me, you want easy, delicious ideas for Fourth of July desserts with red white blue icebox cake that don’t involve slaving over a hot oven when it’s blazing outside. And trust me, this Red, White, and Blue Icebox Cake is going to be your new best friend for holiday gatherings. It’s ridiculously simple, looks SO festive with those vibrant colors, and tastes like a dream. I have so many memories of whipping this up for backyard BBQs and picnics – it’s the quintessential no-bake summer treat that everyone devours in minutes!
Why You’ll Love This Fourth of July Desserts With Red White Blue Icebox Cake
This isn’t just any dessert; it’s a holiday superstar! Here’s why you’ll be making it for every summer celebration:
- Super Easy to Make: Seriously, no baking involved! Just layer, mix, and chill. It’s perfect for when you’re short on time or just don’t want to turn on the oven.
- Stunning Red, White, and Blue! It looks absolutely gorgeous on your dessert table, making it the perfect centerpiece for your Fourth of July spread. Those berry colors are just dreamy!
- Perfect for Warm Weather: Since it’s a no-bake dessert, it’s the ultimate choice for hot summer days. Light, refreshing, and totally satisfying without being heavy.
- Crowd-Pleaser Guaranteed: Kids and adults alike go crazy for this cake. The soft, creamy layers and crisp-yet-tender graham crackers are just irresistible.
Ingredients for Your Red White Blue Icebox Cake
You’re going to love how simple and straightforward the ingredients are for this Red White and Blue Icebox Cake! It’s a recipe where quality really shines through, so try to grab the freshest berries and good cream you can find. Don’t worry about fancy stuff; we’re keeping it easy and delicious.
For the Cake Layers
- Graham Crackers: You’ll need about a package, which is usually around 14 to 16 full sheets. These are the backbone of our cake, softening up beautifully overnight to give it that amazing, melt-in-your-mouth texture. It’s like magic!
- Cold Heavy Cream: 2 cups is what you’ll want. Make sure it’s super cold, straight from the fridge – this is key for getting those fluffy whipped cream peaks we need.
- Powdered Sugar: 1 cup is perfect for sweetening up our cream. It dissolves so easily, giving us that smooth, dreamy filling.
- Vanilla Extract: Just 1 teaspoon adds that classic, comforting flavor that just makes everything taste better.
For the Festive Topping
- Whipped Topping: One container, thawed. You know, the kind that’s already whipped up and ready to go, like Cool Whip. It makes this cake a total breeze and adds a lovely lightness.
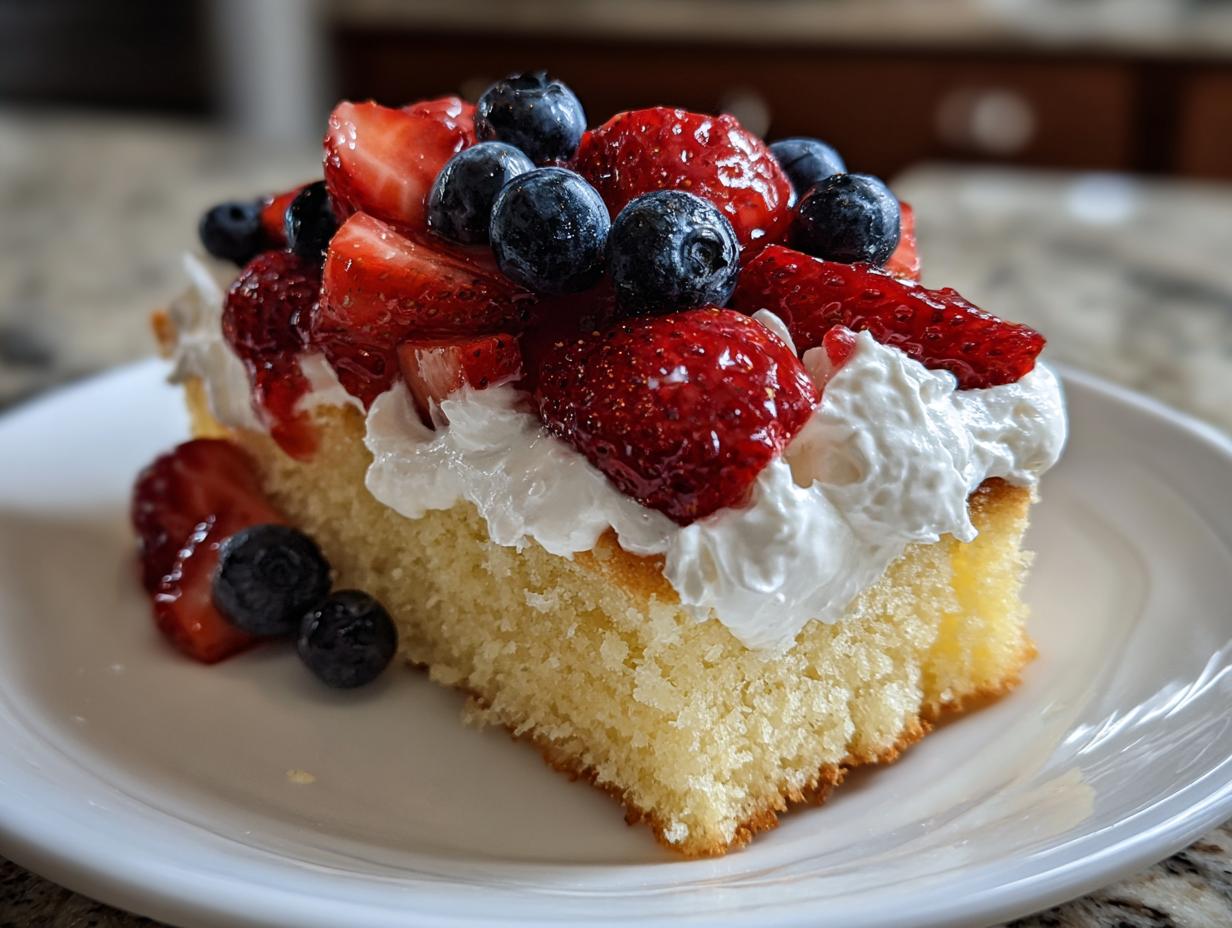
- Fresh Blueberries: Half a cup for that beautiful blue layer. Pop them in your mouth while you’re decorating, I dare you!
- Sliced Fresh Strawberries: Another half cup, sliced thin. Their sweet-tart flavor and vibrant red color are a must for that patriotic look.
Trust me, using good quality ingredients really makes a difference here. The fresh berries are what give it that pop of flavor and stunning color, and the cold cream? Well, that’s the secret to that luscious, fluffy filling. You’ve got this!
Equipment You’ll Need for This Easy Icebox Cake
Okay, so you don’t need a whole professional bakery setup for this one, thankfully! You’ll absolutely want a good ol’ fashioned 9×13 inch baking dish. That’s where all the magic happens. And to get that lovely fluffy cream filling, an electric mixer is a lifesaver. Whether it’s a hand mixer or a stand mixer, either will do the job perfectly!
Step-by-Step Guide to Making Fourth of July Desserts With Red White Blue Icebox Cake
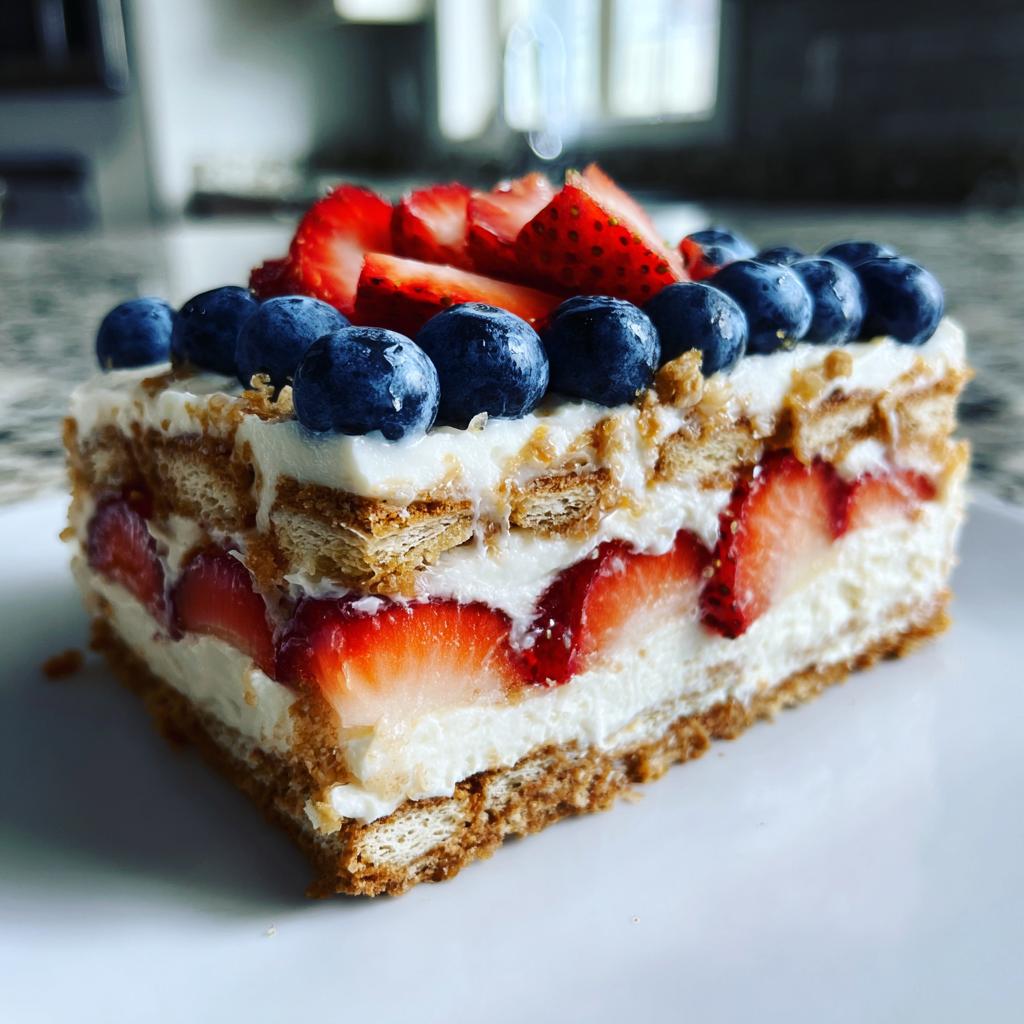
Alright, let’s get this amazing Fourth of July treat assembled! It’s so easy, you’ll feel like a dessert ninja.Preparing the Base Layer
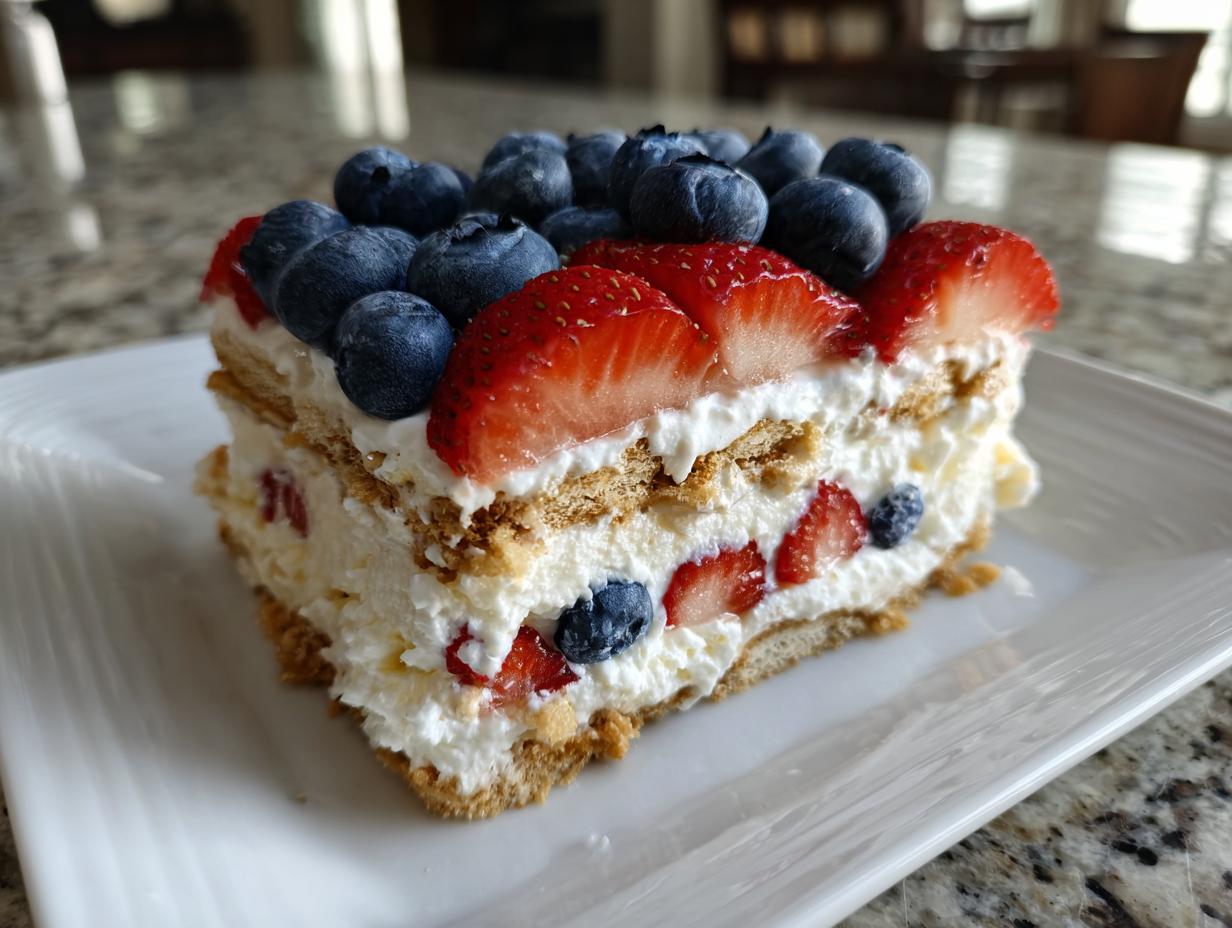
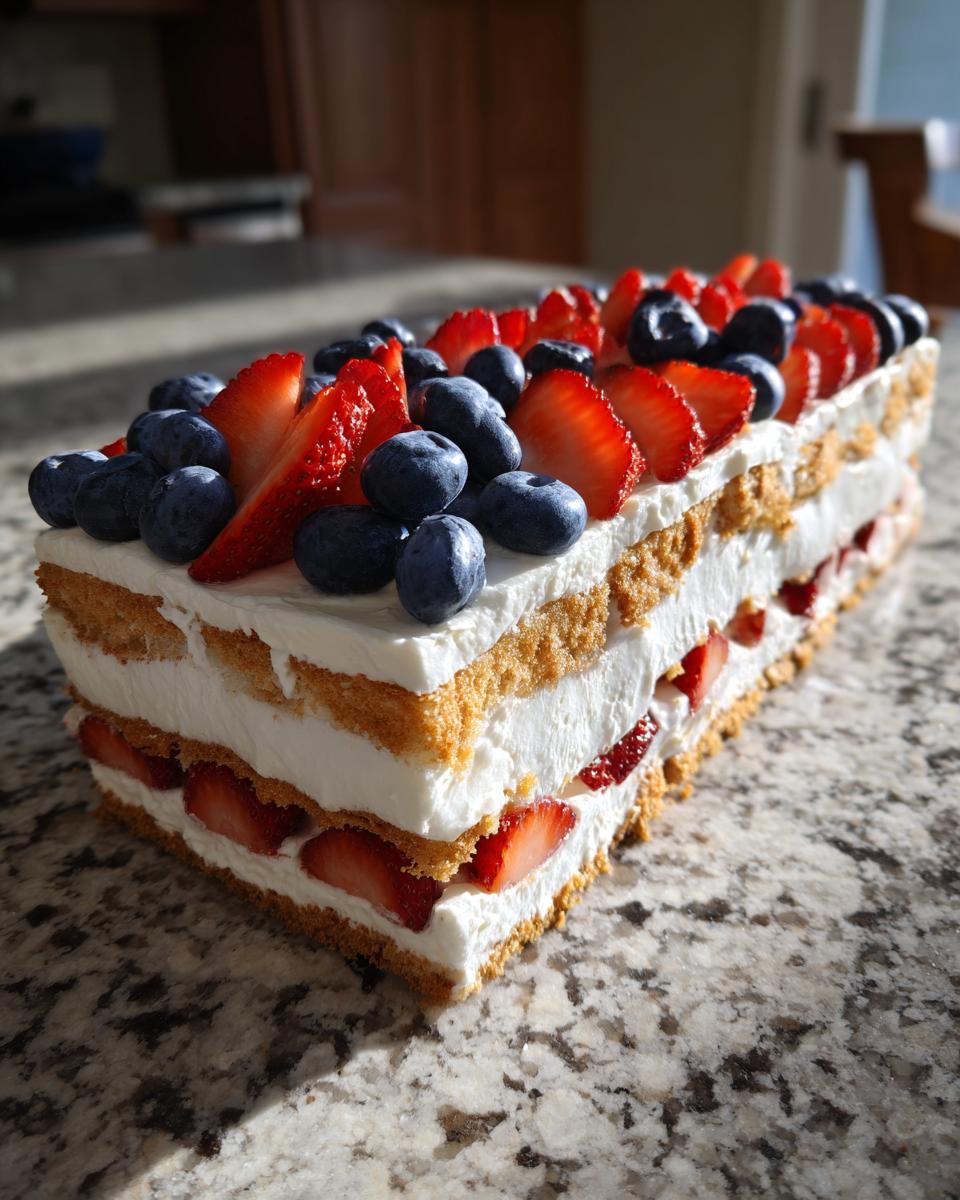
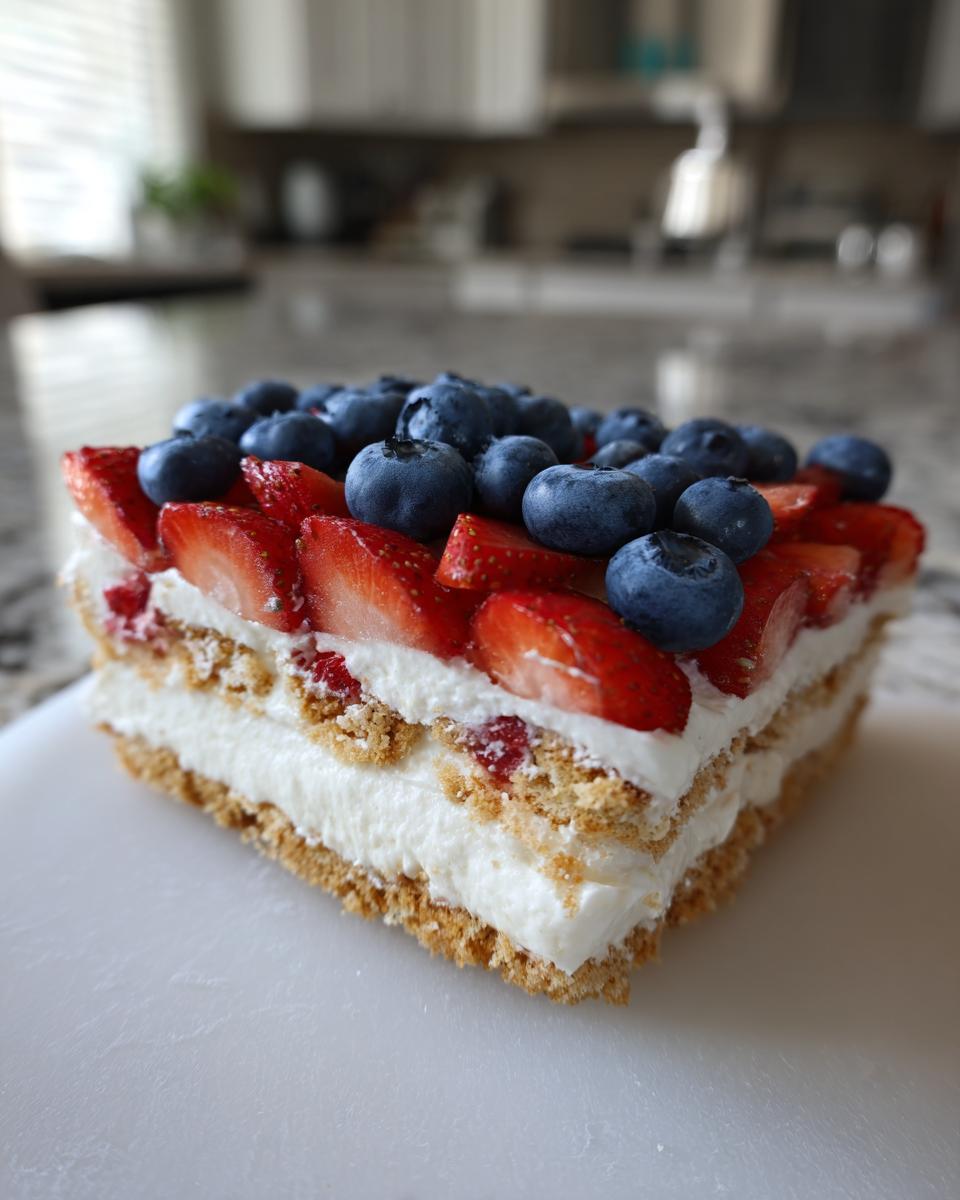
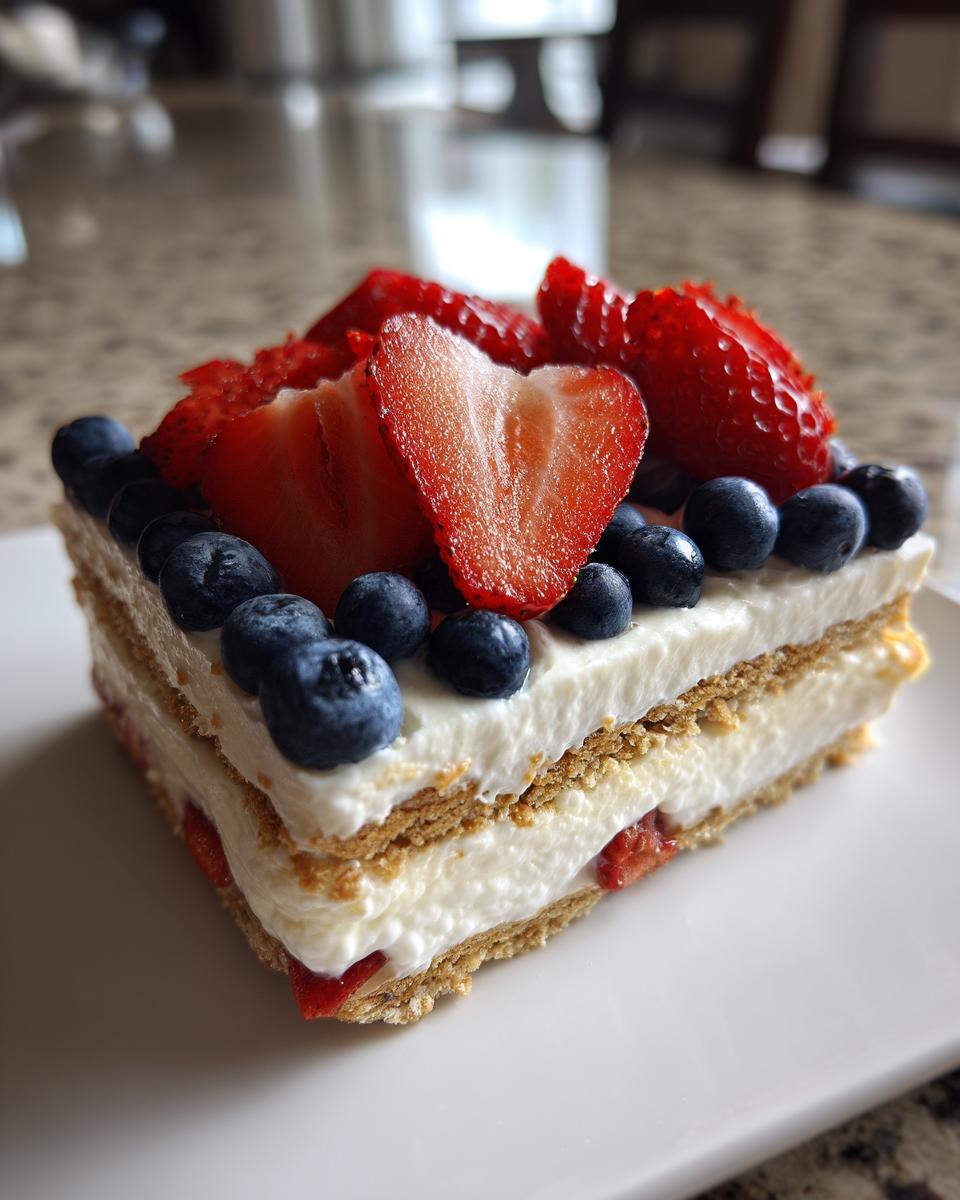
First things first, grab your trusty 9×13 inch baking dish. We’re going to line the bottom with a layer of graham crackers, packing them in snugly. Don’t worry if you have to break a few to fill in all the gaps – it’s like a little cracker puzzle! Then, spread about half of your fluffy whipped cream mixture evenly over that cracker base. Smooth it out so you have a nice, even layer for the next set of crackers.
Whipping the Cream Filling
Now for that dreamy cream! Grab a big bowl and pour in your very cold heavy cream. Whip it up with your electric mixer until it starts to get soft peaks – you know, when the cream holds its shape a little but the tips flop over. Gradually add in that powdered sugar and the vanilla extract, and keep on whipping until you’ve got stiff peaks. That means when you lift the beater, the cream stands straight up without falling over. That’s the texture we want!
Assembling and Chilling Your Icebox Cake
Okay, time for another layer of graham crackers right on top of that first cream layer. Then, gently spread the rest of your whipped cream mixture over these crackers. Make sure it’s all covered! Now, cover the whole dish tightly with plastic wrap. This is super important: pop it into the fridge for at least 4 hours, but honestly, overnight is even better. This gives those graham crackers time to soften up and absorb all that creamy goodness, turning into a cake-like texture. Resist the urge to dig in too early!
Decorating for a Festive Finish
Once your icebox cake has had its glorious chill time, it’s time to make it sparkle! Carefully spread the thawed whipped topping all over the top of the chilled cake. Then comes the fun part – arranging your fresh blueberries and sliced strawberries to make that classic red, white, and blue pattern. You can do stripes, a star, or just a festive jumble. It’s going to look absolutely adorable and taste even better!

Tips for the Perfect Red White Blue Icebox Cake
Making this icebox cake is already pretty foolproof, but here are a few little tricks I’ve picked up along the way to make it truly spectacular. These little tweaks can really level up your dessert game!
First off, for that unbelievably smooth cream filling, make sure your heavy cream is COLD. Like, fridge-cold. If it’s even a little warm, it just won’t whip up properly, and then you’re stuck with runny cream, which is a total bummer when you’re aiming for that fluffy texture. Speaking of cream, if you want extra vibrant colors without relying on food coloring for the blue, consider using a slice of this sugar-free ice cream base for a blue layer, as it’s already got that color built in! Just make sure it’s partially thawed to a spreadable consistency.
Another little secret? Don’t skimp on the chilling time! I know it’s SO tempting to just dive in, but letting it chill overnight is crucial. That’s what transforms the graham crackers from crunchy cookies into soft, cake-like layers. It’s the magic that holds it all together. If you’re in a real pinch, four hours is the absolute minimum, but trust me, the extra wait is worth it. For alternatives, if you can’t find graham crackers, digestive biscuits or even some of the no-bake Oreo-like bites we have can work in a pinch, though they’ll change the flavor profile a bit!
Ingredient Notes and Substitutions
So, let’s talk ingredients for this amazing Red White and Blue Icebox Cake! Sometimes you might not have exactly what’s listed, and that’s totally fine. For those crunchy graham crackers, if you can’t find them, don’t sweat it! Digestive biscuits work really well, or even shortbread cookies can give it a slightly different, but still delicious, twist. Just make sure they’re not overly buttery or crumbly. And for that fluffy whipped topping – if you’re not a fan of the store-bought stuff, or just want to go homemade, feel free to whip up your own! Just take about 2 cups of heavy cream, whip it until it’s nice and thick, and sweeten it with a little powdered sugar and vanilla. Easy peasy!
Serving and Storage Instructions
This Red, White, and Blue Icebox Cake is honestly best served nice and cold, straight from the fridge! It’s the perfect way to end a hot summer meal. Just slice it up into those lovely portions and let everyone dig in. If you happen to have any leftovers (which is rare in my house!), just cover the dish tightly with plastic wrap or pop the slices into an airtight container. It’ll keep in the refrigerator for about 2-3 days. Honestly, it’s still pretty darn good on day two, though the graham crackers get softer the longer they sit. Just make sure it stays chilled!
Frequently Asked Questions About This Icebox Cake
Got questions about this super easy Red, White, and Blue Icebox Cake? I’ve got answers! This cake is a summer essential, and here are some things people often ask.
Can I make this icebox cake ahead of time?
Oh, absolutely! That’s one of the best things about this Fourth of July dessert. You can totally make it the day before you need it. In fact, I think it’s even better when it chills overnight! Making it ahead means one less thing to worry about on your busy holiday. Just pop it in the fridge after you assemble it, and it’ll be ready to go for your celebration.
What can I use instead of graham crackers?
No graham crackers? No problem! If you can’t find them, digestive biscuits work like a charm and give a similar, slightly less sweet texture. Some people have even used shortbread cookies for a richer flavor, or even vanilla wafers in a pinch. Just make sure whatever you use isn’t too crumbly once baked. For a really fun twist, you could even try layering with some of these no-bake Oreo-like bites, though that will change the color profile, of course!
How long does the red white blue icebox cake need to chill?
This is super important for that perfect icebox cake texture! You need at least 4 hours for the graham crackers to soften up and really transform into those cake-like layers. But honestly, the absolute sweet spot is overnight. Letting it chill for about 8-12 hours gives it the best chance to absorb all the creamy goodness. That way, you get that wonderfully soft, melt-in-your-mouth consistency that makes this dessert so amazing.
Can I add food coloring for a brighter blue?
You sure can! If you want a really vibrant blue layer and the berries aren’t quite cutting it for you, a drop or two of blue food coloring mixed into a portion of the whipped cream filling works great. Just be careful not to add too much, or it can get a bit messy. Sometimes, I even use a bit of that sugar-free ice cream recipe I have for a blue layer, but that’s a whole different kind of project! For this cake, a little food coloring in the cream is a simple way to boost that patriotic color!
Estimated Nutritional Information
Just a heads-up, since this is a homemade recipe using various ingredients, the exact nutritional info can bounce around a bit depending on what you use and how big your slices are. But, as a general estimate, you’re looking at something around 300-350 calories per serving. This would typically include about 15-20g of fat, a few grams of protein, and around 40-45g of carbohydrates. Enjoy it as a special treat!
Red White and Blue Icebox Cake
Ingredients
Equipment
Method
- Line the bottom of a 9×13 inch baking dish with a layer of graham crackers. You may need to break some to fit.
- In a large bowl, beat the cold heavy cream with an electric mixer until soft peaks form.
- Gradually add the powdered sugar and vanilla extract, and continue beating until stiff peaks form.
- Spread half of the whipped cream mixture evenly over the graham crackers.
- Add another layer of graham crackers on top of the whipped cream.
- Spread the remaining whipped cream mixture over the second layer of graham crackers.
- Cover the dish with plastic wrap and refrigerate for at least 4 hours, or preferably overnight, to allow the crackers to soften.
- Before serving, spread the thawed whipped topping over the chilled cake.
- Decorate the top with fresh blueberries and sliced strawberries to create a red, white, and blue pattern.