I still remember the day I realized that healthy desserts didn’t have to taste like cardboard. Seriously! While hosting a small get-together, I decided to get a little adventurous and experiment with some low-carb ingredients to whip up a healthier version of my absolute favorite cheesecake. The moment I took my first bite of those Healthy No-Bake Oreo Cheesecake Bites, I was absolutely thrilled! They were so creamy, completely delightful, and hit that perfect sweet spot between indulgence and nutrition. Since that day, they’ve become a total staple in my dessert rotation, absolutely proving that you can totally enjoy treats that fit right into a healthy lifestyle without sacrificing even a tiny bit of flavor or fun.
Why You’ll Love These Healthy No-Bake Oreo Cheesecake Bites
Honestly, why wouldn’t you love these? They’re ridiculously easy to whip up – practically zero effort for maximum deliciousness. You get that rich, decadent cheesecake taste without any guilt, which is just a win-win. Plus, the fact that they’re no-bake is a total lifesaver, especially when you need a quick dessert fix or don’t want to heat up the kitchen. They’re perfect for satisfying your sweet tooth while keeping things light and healthy!
Gather Your Ingredients for Healthy No-Bake Oreo Cheesecake Bites
Alright, let’s get real with what you need for these amazing Healthy No-Bake Oreo Cheesecake Bites. It’s not a ton of fancy stuff, promise! First up for the crust, you’ll want 1/4 cup of butter, all melted up nice and smooth, and about 12 Oreos, chopped up super fine. For the creamy filling, grab 7 Oreos (these can be a bit chunkier), 8 ounces of cream cheese that’s softened so it mixes easily, 1/2 cup of powdered sugar, a teaspoon of vanilla extract, and 1 cup of heavy whipping cream. And for that final flourish on top, just 5 more Oreos, chopped up.
Essential Equipment for Making Healthy No-Bake Oreo Cheesecake Bites
To whip up these gorgeous little bites, you won’t need a whole commercial kitchen. Just a few handy tools will do the trick:
- A food processor is a lifesaver for getting those Oreos nice and fine for the crust.
- A standard cupcake tray is perfect for shaping these bites.
- Cupcake liners (paper or silicone) make sure nothing sticks and cleanup is a breeze.
- Some basic measuring cups and teaspoons are essential for getting the ratios just right.
- And maybe a small saucepan if you prefer melting your butter on the stovetop instead of the microwave.
Step-by-Step Guide to Your Healthy No-Bake Oreo Cheesecake Bites
Okay, pulling these amazing Healthy No-Bake Oreo Cheesecake Bites together is super easy, trust me! We’re going to break it down into a few simple steps. First things first, let’s get that crust ready. I like to give the 5 Oreos for the topping a rough chop and set them aside – we’ll use them later. Same with the 7 Oreos for the filling, a little chop and aside they go. Then, take the 12 Oreos meant for the crust and finely chop them. You want them like little breadcrumbs almost. After that, melt your butter. I usually pop it in the microwave for about 30 seconds, but a quick melt in a little saucepan works great too. Mix that melted butter right into your finely chopped crust Oreos. Now, line your cupcake tray with those liners – 12 of them! Spoon equal amounts of that buttery Oreo mixture into each liner and press it down firmly. Use the back of a spoon or a small measuring cup to really flatten it out. This is what gives you that nice, solid base, and you can learn more about different ways to make Oreo cheesecake bites here!
Preparing the Crust for Your Healthy No-Bake Oreo Cheesecake Bites
So, for the base of our Healthy No-Bake Oreo Cheesecake Bites, you’ve already finely chopped those 12 Oreos, right? Perfect! Now, melt your butter – just a quick 30 seconds in the microwave or a gentle heat on the stove. Pour that melted goodness right over the crushed Oreos and give it a good stir until it’s all combined and looks like damp sand. Take your cupcake tray with liners and divvy up that mixture evenly into each one. Give it a good press down with the bottom of a small glass or spoon. You want it nice and compact so it doesn’t crumble apart later!
Creating the Creamy Filling
Now for the star of the show – that dreamy filling! Grab your softened cream cheese, powdered sugar, vanilla extract, and the heavy whipping cream. Toss all of that into your food processor. Whiz it all up until it’s super smooth and creamy. Seriously, no lumps allowed! Once it’s perfectly blended, transfer that beautiful mixture to a bowl. Now, gently fold in those 7 chopped Oreos that we set aside earlier. You don’t want to overmix here; you still want to see those little chunks of Oreo goodness in the filling!
Assembling and Chilling Your Healthy No-Bake Oreo Cheesecake Bites
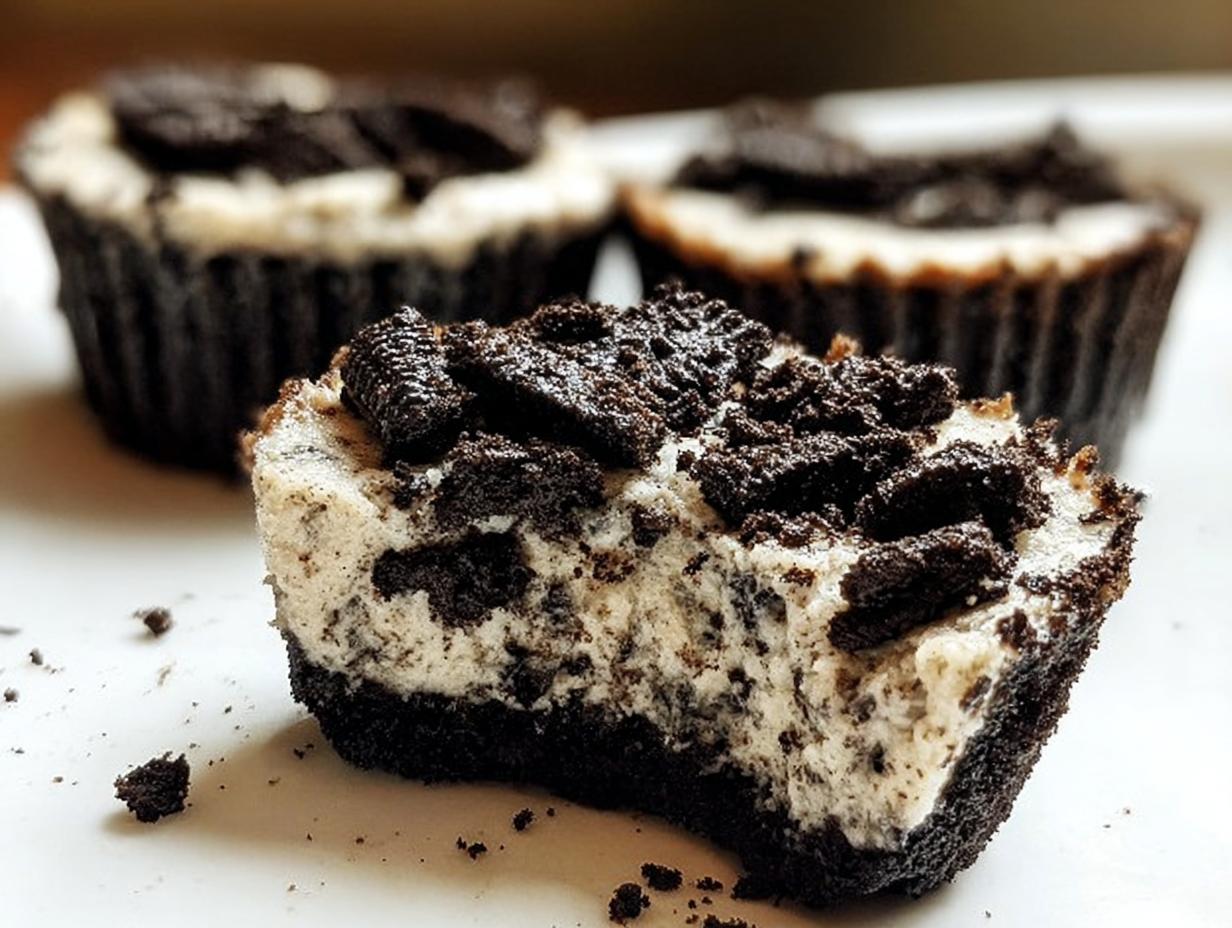
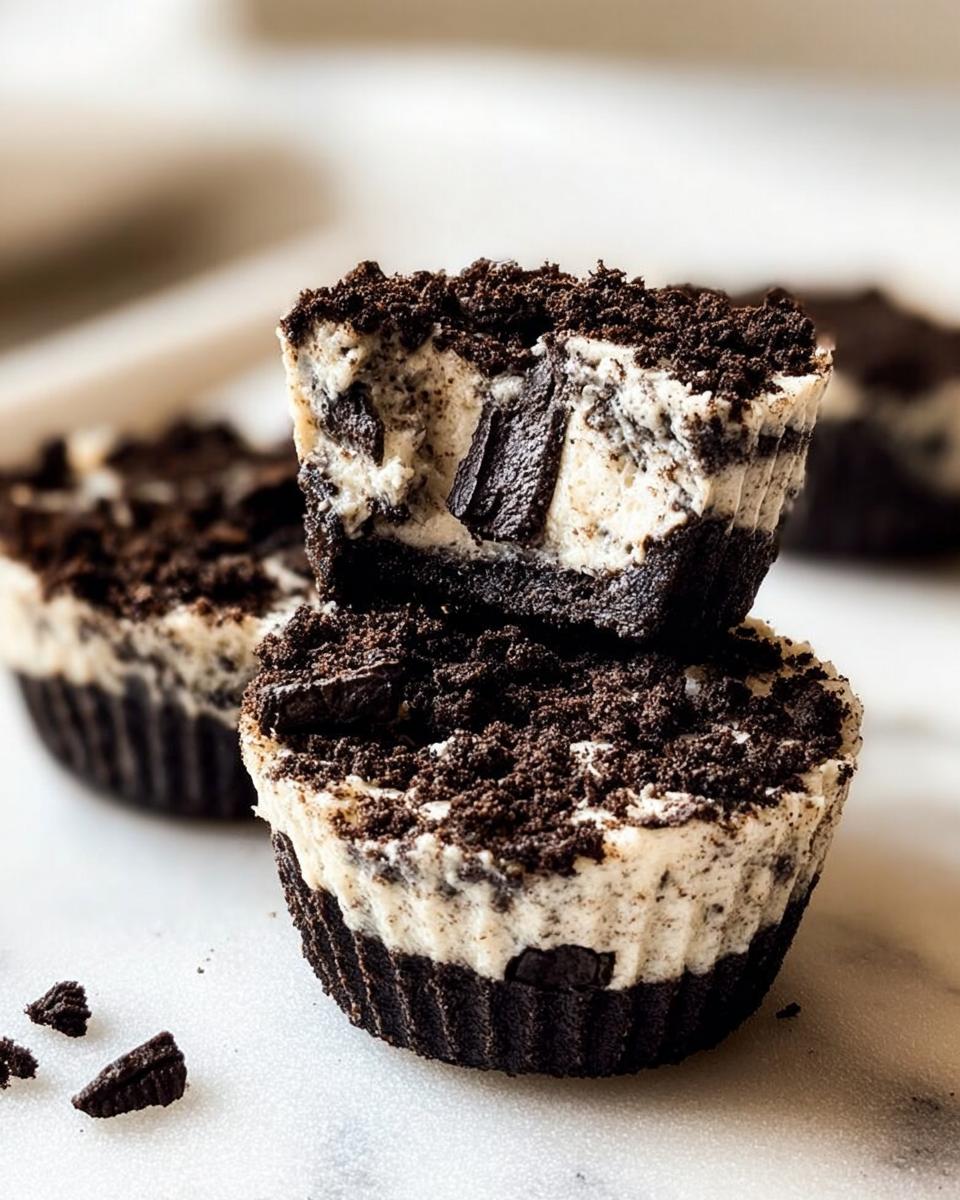
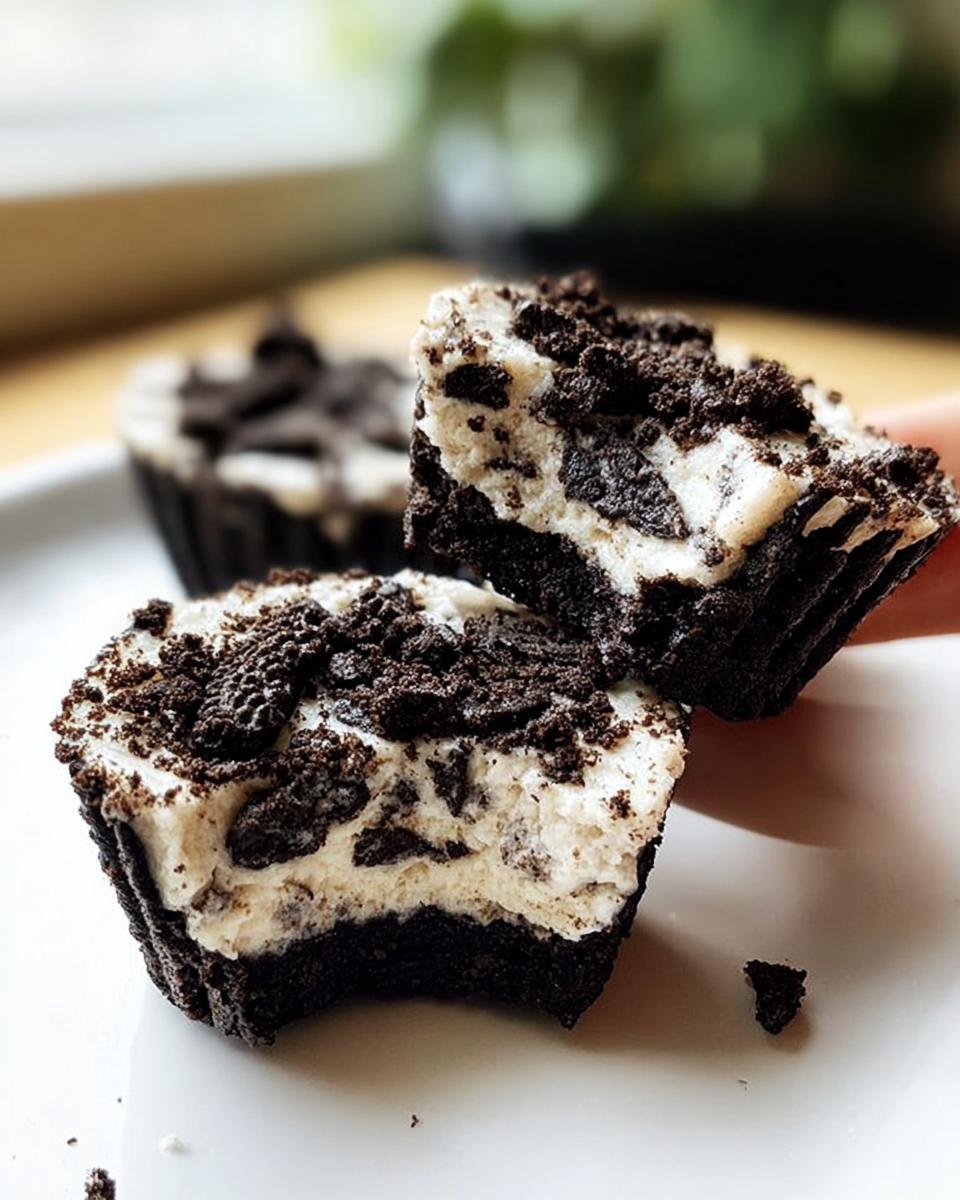
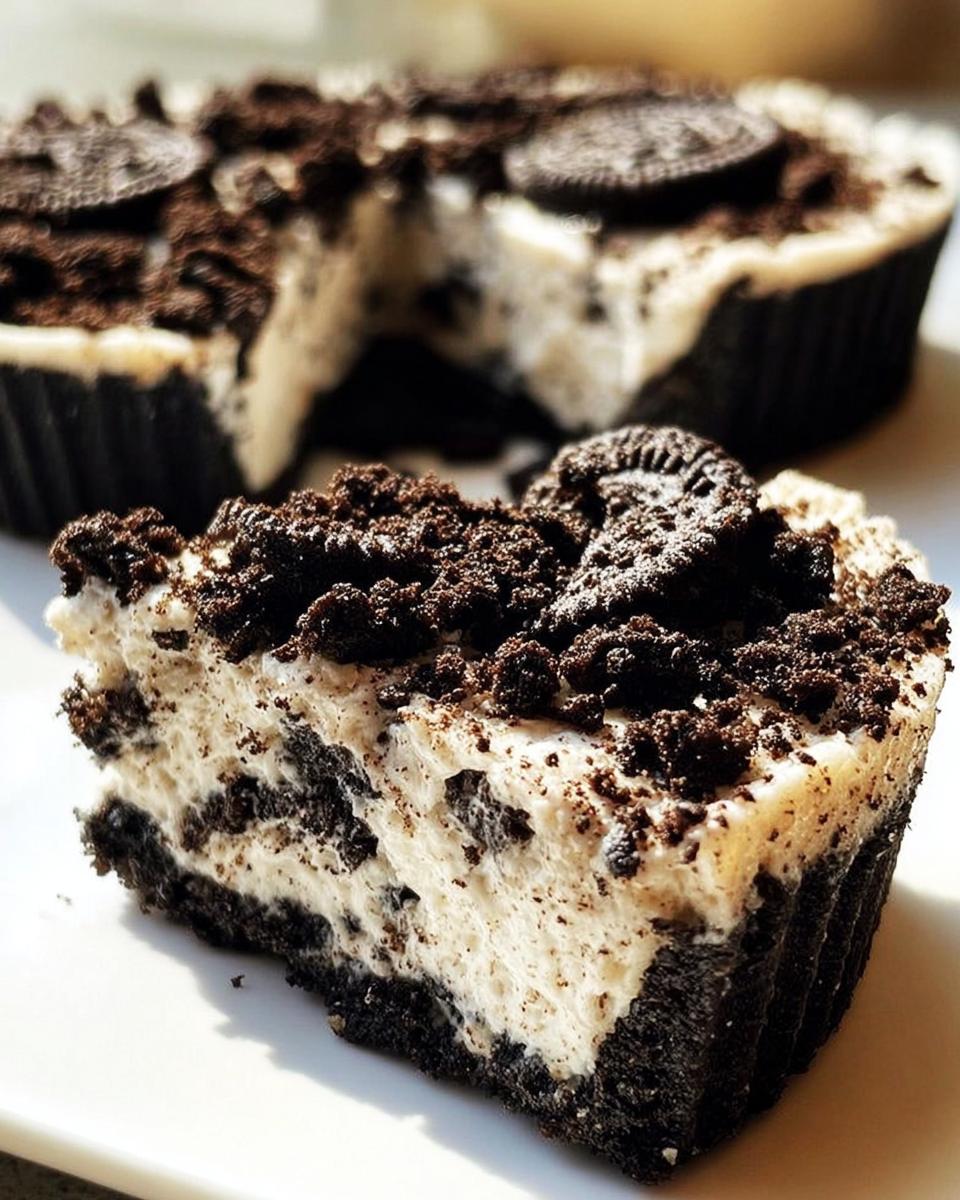
We’re almost there! Time to assemble these little gems. Spoon the creamy Oreo filling right on top of that prepared crust in each cupcake liner. Try to get them as even as possible. Then, sprinkle those last 5 chopped Oreos over the top of each one. They look so pretty like that! Now, the hardest part: waiting. Pop the whole tray into the refrigerator for at least 1 hour. This gives the filling time to set up perfectly. If you can’t wait or want to make these ahead, they also freeze really well!

Tips for Perfect Healthy No-Bake Oreo Cheesecake Bites
Alright, friend, let’s talk about making these cheesecake bites absolutely *perfect* every single time. A little bit of prep makes a huge difference! First off, make sure your cream cheese is truly softened. If it’s cold, you’ll end up with lumps, and nobody wants lumpy cheesecake filling, right? I usually leave mine on the counter for about an hour before I start. Also, when you’re whipping the heavy cream, don’t overdo it! You want it thick and luscious, like soft peaks, not stiff like meringue. And for that crust? Really press it down firmly into those liners. It gives you a nice sturdy base that holds everything together beautifully. For more tips on making healthy meals taste great, which really applies here too, check out this great resource!
Ingredient Notes and Substitutions for Healthy No-Bake Oreo Cheesecake Bites
Let’s chat about the ingredients in our Healthy No-Bake Oreo Cheesecake Bites, because sometimes life throws you a curveball, and you need options! For the cream cheese, using full-fat really gives you that classic, rich cheesecake texture. If you’re looking to cut down a little, you *could* try light cream cheese, but you might notice the filling is a bit softer. And about those Oreos – they’re kind of the star here! While traditional Oreos are used, if you’re really sticking to a lower-sugar or keto lifestyle, you can find “keto” or “sugar-free” sandwich cookies that mimic that chocolatey crunch. They might change the flavor profile a tad, but hey, it’s a great way to adapt! For a touch of sweetness, while powdered sugar is standard, you could experiment with a sugar-free powdered sweetener if you’re watching your sugar intake closely – just make sure it measures cup-for-cup like regular powdered sugar. You can find some neat ideas for sugar-free ice cream that might give you inspiration if you want to explore more substitutions!
Storage and Reheating Instructions
Got leftovers? Lucky you! These little bites store like a dream. Just pop them into an airtight container and keep them in the fridge. They’ll stay wonderfully creamy and delicious for up to 3-4 days. If you want to make them last even longer, or just love having a sweet treat ready to go, they freeze surprisingly well too! Just pop them in a freezer-safe container and they’ll be good for about a month. No need to reheat them, honestly – they taste amazing straight from the fridge or even slightly chilled from the freezer. Easy peasy!
Frequently Asked Questions About Healthy No-Bake Oreo Cheesecake Bites
Got some lingering questions about whipping up these yummy Healthy No-Bake Oreo Cheesecake Bites? I totally get it! Let’s dive into some common curiosities to make sure you’re all set for cheesecake success.
Can I make these bites even healthier?
Absolutely! One of the best things about these bites is how customizable they are. If you’re watching sugar closely, you can swap the powdered sugar for a good quality sugar-free powdered sweetener. Also, while regular Oreos give you that classic taste, there are “keto” or “sugar-free” sandwich cookies out there that you could use for the crust and filling if you’re aiming for a lower-carb version. It’s all about making them work for *your* healthy lifestyle!
How do I get clean edges when I remove the bites from the wrappers?
Oh, the struggle is real sometimes! The best trick is to make sure they are thoroughly chilled. If they’re still a little soft, they can stick. You can also try gently peeling the wrapper down and away from the sides before lifting the bite out. Sometimes, a tiny dab of water or edible food-safe glue on the wrapper’s edge can help it detach cleanly, but usually, just making sure they’re well-set from refrigeration is the key.
What if I don’t have a food processor?
No food processor? No problem at all! You can totally achieve finely chopped Oreos by placing them in a sturdy zip-top bag. Seal it up, getting out as much air as possible, and then just go to town with a rolling pin or even the flat bottom of a heavy pan. It takes a little elbow grease, but you can get them nice and fine for the crust that way. For the filling chunks, just chop them with a knife – it’ll be perfectly rustic!
Can I freeze these Healthy No-Bake Oreo Cheesecake Bites?
Yes, you absolutely can! They freeze beautifully. Just pop them into an airtight container or a freezer-safe bag once they’re fully set. They’ll keep well for about a month. It’s awesome to have a batch ready to go for when that sweet craving hits. It’s a bit like having a stash of guilt-free happiness waiting in the freezer, similar to how you might prep other meals for the week!
Estimated Nutritional Information
Alright, let’s talk numbers! Keep in mind these are just estimates per bite, and they can change based on the exact ingredients and brands you use. We’re looking at roughly 240 calories, around 18g fat, 3g protein, and about 18g carbohydrates per bite, including the Oreos. Remember, this is for one of the 12 bites!
Estimated Nutritional Information
So, about the nutrition stuff – remember these numbers are just a rough guide, okay? They can totally shift depending on the brands you use and if you tinker with the ingredients at all. Generally, for one of these tasty little bites, you’re probably looking at around 240 calories. That breaks down to about 18 grams of fat, a modest 3 grams of protein, and roughly 18 grams of carbs. That’s pretty darn good for such a decadent-tasting treat, especially when you consider it includes those yummy Oreos!

Healthy No-Bake Oreo Cheesecake Bites
Ingredients
Equipment
Method
- Roughly chop 5 Oreos for the topping and set aside. Roughly chop 7 Oreos for the filling and set aside.
- Finely chop 12 Oreos for the crust and set aside.
- Melt the butter. You can do this in the microwave for about 30 seconds or melt it in a saucepan.
- Mix the melted butter with the 12 finely chopped Oreos.
- Line a cupcake tray with 12 cupcake liners.
- Fill the 12 cupcake liners with equal amounts of the butter and Oreo mixture. Press down to flatten. Use a ⅓ size measuring cup or a spoon to flatten the crust.
- In a food processor, combine the cream cheese, powdered sugar, vanilla extract, and heavy cream. Mix until thoroughly combined.
- Hand mix in the 7 chopped Oreos for the filling.
- On top of the Oreo crust, fill the 12 cupcake liners with equal amounts of the creamy Oreo mixture.
- Top with the remaining 5 chopped Oreos.
- Refrigerate for 1 hour. These also freeze well.