Oh, who doesn’t love a grilled cheese, right? But let’s be real, sometimes the ones we make at home just don’t quite hit that magical spot like the ones from your favorite diner or fancy café. That’s where these Restaurant-Style Grilled Cheese Recipes at Home (2025) come in! I can still remember the first time I had a truly memorable grilled cheese sandwich at a little bistro. The combination of perfectly toasted bread, melty cheeses, and a hint of something special brought back nostalgia for childhood lunches. Years later, I decided to replicate that experience at home, experimenting with various cheeses and artisan breads. The joy of creating that perfect blend of flavors, paired with friends and family gathered around, made me realize that restaurant-style grilled cheese could easily become a staple at home, bringing comfort and connection to our kitchen table.
Why You’ll Love These Restaurant-Style Grilled Cheese Recipes at Home (2025)
Seriously, making restaurant-quality grilled cheese at home is totally doable and SO worth it! Here’s why you’ll be obsessed:
- Restaurant-Quality Taste, Home Kitchen Ease: You get that amazing, crave-worthy grilled cheese experience without leaving your house!
- Super Speedy: We’re talking minutes here! Perfect for a quick lunch, a fast dinner, or even a late-night snack craving.
- Incredibly Melty Cheese: Get ready for that gooey, stretchy cheese pull. It’s pure comfort in every single bite.
- Perfectly Toasted, Golden Crust: That satisfying crunch of toasted bread is key, and this method nails it every time.
- Endless Customization: Once you get the hang of it, the flavor possibilities are pretty much limitless!
Essential Ingredients for Perfect Restaurant-Style Grilled Cheese at Home
Alright, let’s talk about what goes into making a grilled cheese that just screams “fancy café” but is secretly super simple. Getting the ingredients right is half the battle, trust me! The quality of what you start with really makes a difference in the final melty magic.
For your perfect sandwich, you’ll need:
For the Sandwich
- 8 slices of bread – I love using thick-cut Texas toast, really sturdy sourdough, or just a good sandwich bread. Anything that can handle a good toasting!
- 4 tablespoons of unsalted butter – Make sure it’s softened so it spreads like a dream.
- 4 slices of medium cheddar cheese
- 4 slices of Gouda cheese
- 4 slices of Havarti cheese
Using good quality ingredients here, especially the cheese and bread, is your secret weapon for that amazing restaurant taste. Don’t skimp!

Ingredient Notes and Delicious Substitutions
Okay, so the bread and cheese are kind of the stars of the show here, right? You can totally jazz this up with different kinds, and it’s still going to be amazing! For the bread, while I love a good thick slice of Texas toast or a tangy sourdough, don’t be afraid to experiment. A hearty whole wheat or even a challah can be delicious, just make sure it’s not too thin or it might get soggy. The key is a sturdy base that toasts up beautifully.
Now, the cheese! This is where you can really have some fun. The combo I listed – cheddar, Havarti, and Gouda – gives you that perfect balance of sharp, creamy, and a little bit nutty. But honestly, a good melty grilled cheese can handle almost anything. Try mixing in some Monterey Jack for extra gooeyness, Swiss for a classic flavor, or even a little Pepper Jack if you like a tiny kick. Using a blend of cheeses is definitely your best bet for that superior, gooey, melty texture that sets restaurant grilled cheese apart. You can even get some ideas from other great grilled cheese recipes to see what combos tickle your fancy!
Step-by-Step Guide to Restaurant-Style Grilled Cheese Recipes at Home (2025)
Alright, let’s get cooking! Making these restaurant-worthy grilled cheeses at home is easier than you think. We’re going to focus on getting that perfect golden crust and that irresistibly gooey, melty cheese pull. Just follow these simple steps and prepare for grilled cheese greatness!
Preparing the Bread for the Perfect Grill
First things first, grab your bread slices. You’re going to want to spread about half a tablespoon of that softened butter on ONE side of each slice. This is the side that’s going to hit the pan first, so make sure it’s an even coating for that gorgeous golden-brown finish.
Achieving the Ideal Melt: Cooking the Sandwich
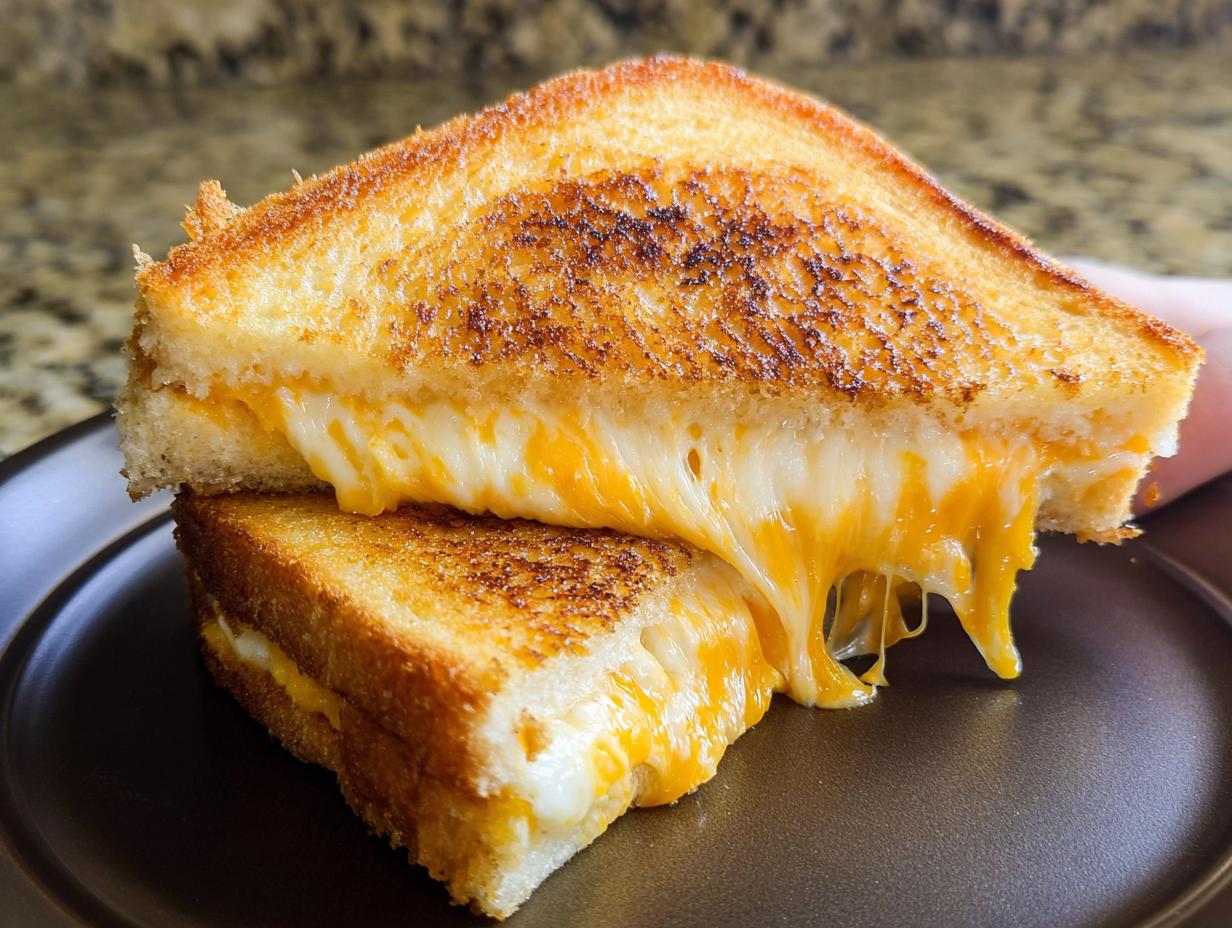
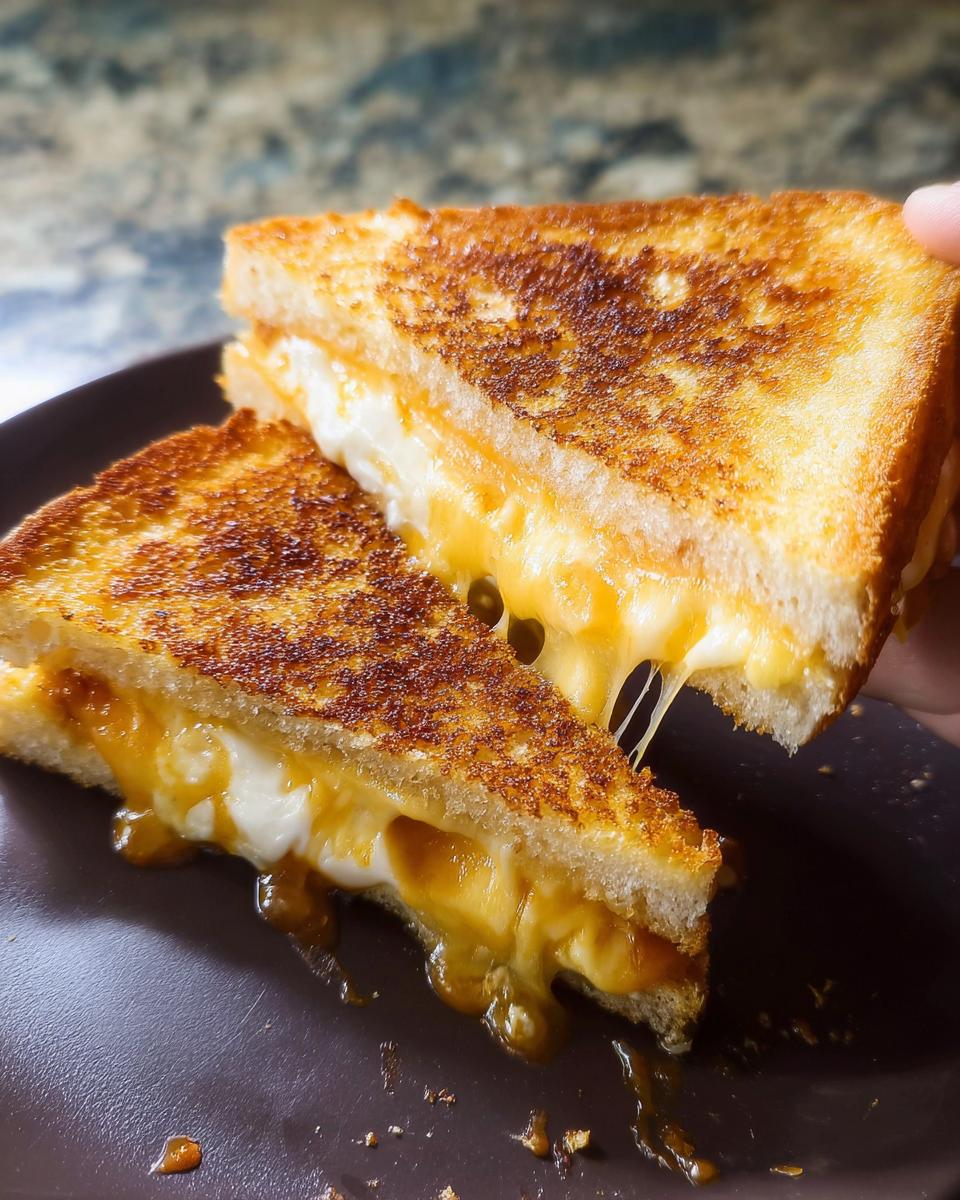
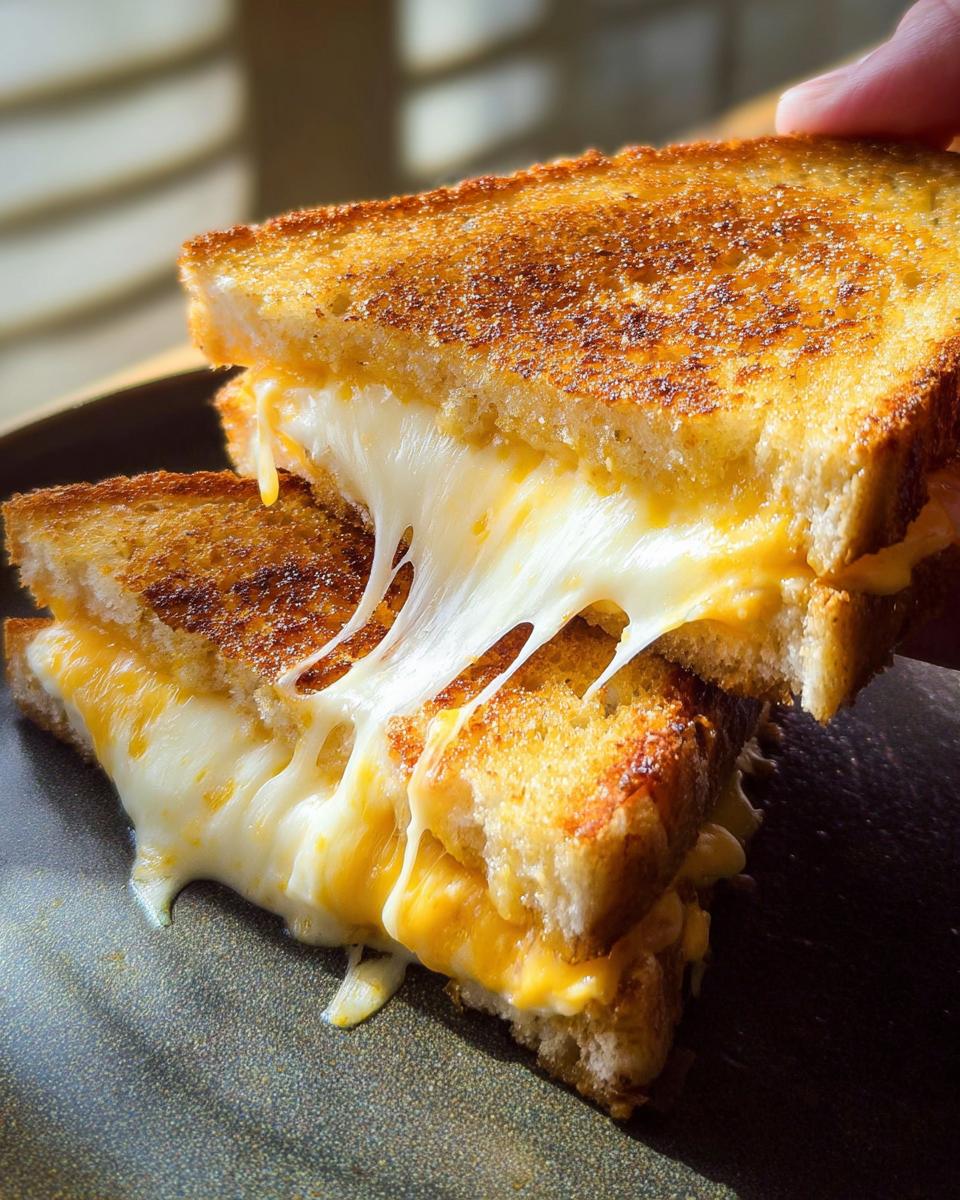
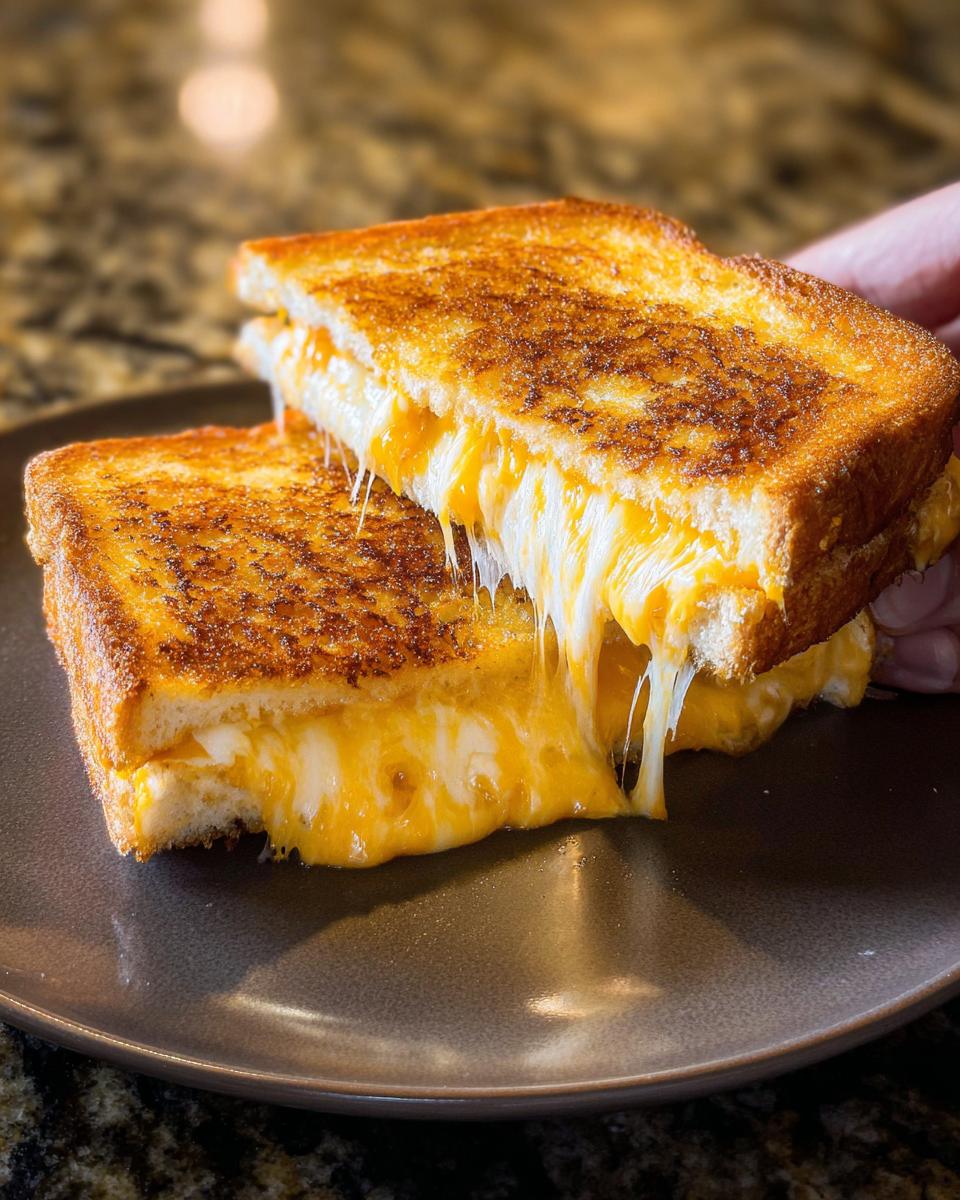
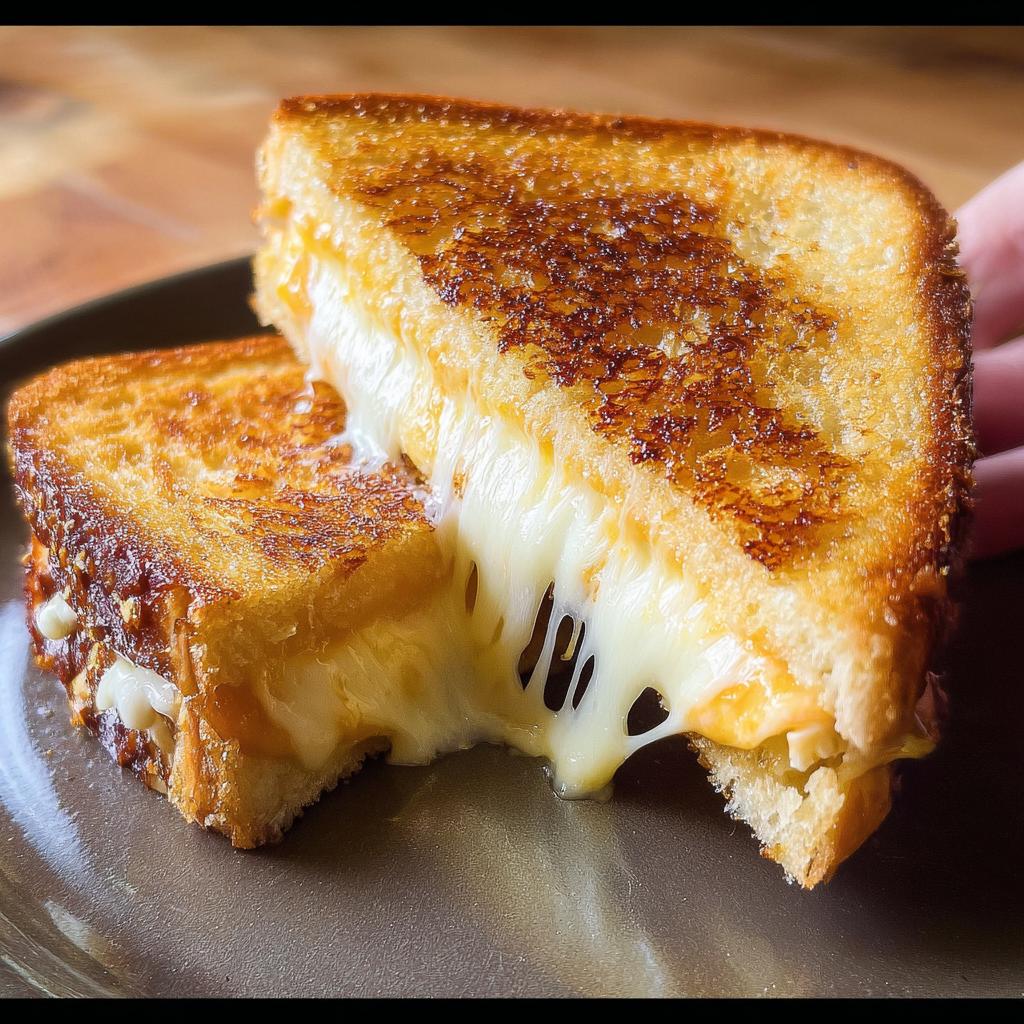
Now, let’s get our pan ready. Heat up a cast iron skillet or a good heavy non-stick pan over medium-low heat. Seriously, medium-low is your best friend here! If you’re using a griddle, aim for around 275°F. Place two of your buttered bread slices, butter-side down, into the warm pan. Quickly layer your cheeses onto one of the bread slices: I like to do cheddar first, then Havarti, and finally the Gouda on top. Once the bottom bread is golden brown and toasty – usually after about 2-3 minutes – carefully close the sandwich. Keep cooking, flipping once, and gently pressing down with your spatula. This helps the cheese melt beautifully and get that nice crust. We’re aiming for that rich golden brown, and you want to keep the heat low enough so the cheese melts completely without burning the bread.
Finishing Touches for Your Restaurant-Style Grilled Cheese
Once both sides are perfectly golden brown and you can see that glorious cheese oozing out just a little, it’s time to slide your masterpiece onto a plate. Let it rest for just a minute (if you can resist!), then slice it diagonally. Boom! Instant restaurant-style perfection, ready to be devoured while it’s still hot and melty. Repeat with your remaining sandwiches.
Tips for Success with Restaurant-Style Grilled Cheese Recipes at Home (2025)
Okay, so you’ve got the basic steps down, but here are a few little secrets I’ve picked up along the way to make your grilled cheese truly next-level. It’s all about those small details that make a big difference, turning a good sandwich into a *great* one!
First off, temperature control is everything. Don’t rush it! Keep that heat on medium-low. I know you’re excited to see that melty cheese, but if the pan is too hot, your bread will burn before the cheese even starts to soften. Patience, my friend, is key here. It allows the cheese to melt slowly and evenly while giving you that perfect, rich golden crust.
Also, don’t be afraid to mix your cheeses! While the combo I gave you is awesome, experimenting is part of the fun. Try adding a bit of something sharp like a good aged cheddar, or something creamy like fontina. The blend makes for a more complex flavor and, honestly, a superior ooey-gooey texture. And speaking of texture, using bread that’s not too fresh – like day-old bread – can actually give you a crispier toast. It’s a little hack that works wonders, almost like using some recipes might suggest for other baked goods to get that perfect texture.
Frequently Asked Questions about Restaurant-Style Grilled Cheese
Got questions about making the ultimate grilled cheese? You’re not alone! Here are some common ones I get, along with my go-to answers to make sure your sandwich is a total winner, every single time.
What is the best bread for a melty grilled cheese?
For that perfect melty grilled cheese, you really want a bread that’s sturdy enough to hold up to all that gooey cheese but also toasts up beautifully. Think thick slices of sourdough, a good country white, or Texas toast. These give you a great crust without getting greasy or falling apart. Avoid super airy, thin breads – they just don’t stand up to the heat and cheese!
How to ensure your cheese is perfectly melty?
The secret is all in the heat and the cheese itself! Use medium-low heat so the bread toasts slowly while the cheese has time to melt all the way through. Also, don’t be afraid to shred your cheese or use thinner slices – they melt faster than thick wedges. A mix of cheeses, like I suggested, is fantastic because different cheeses melt at slightly different rates, giving you that ultimate gooey stretch.
Can I add other ingredients to my restaurant-style grilled cheese?
Oh, absolutely! That’s the best part about making them at home. The possibilities are endless! You can add caramelized onions for a sweet kick, some crispy bacon or ham, maybe even a smear of pesto or a few slices of tomato before you grill. It’s a fantastic way to really make it your own!
Serving and Storing Your Delicious Grilled Cheese
Okay, so you’ve got your perfect, melty grilled cheese! What goes best with it? Honestly, a classic tomato soup is just unbeatable – it’s the ultimate comfort combo. A crisp side salad, maybe something like this simple sprouts salad, adds a nice fresh contrast. And if, by some miracle, you have leftovers (which is rare in my house!), don’t just toss them. Wrap them up tightly in foil and pop them in the fridge. To reheat, it’s best to use a skillet or griddle over low heat to get that crust nice and crispy again, rather than the microwave, which can make it a bit soggy. You could also try them with some pasta sides!
Estimated Nutritional Information
Just a heads-up, the nutritional info for your amazing grilled cheese can totally change depending on the bread and cheese you pick! But as a rough guide, each of these glorious sandwiches comes in at around 499 calories, with about 33g of fat, 20g of protein, and 31g of carbohydrates. These are estimates, of course, but they give you a good idea of the delicious decadence you’re enjoying!
Share Your Restaurant-Style Grilled Cheese Creations!
Now that you know all the secrets to making incredible grilled cheese at home, I can’t wait to hear about it! Did you try a wild cheese combo? Have a favorite bread you swore by? Let me know in the comments below! And if you share your masterpieces on social media, tag me – I’d absolutely love to see your creations come to life! You can also reach out with any questions!
Restaurant-Style Grilled Cheese Recipes at Home (2025)
Ingredients
Equipment
Method
- Spread 1/2 Tbsp of butter on one side of each slice of bread.
- Set a cast iron skillet or heavy non-stick pan over medium/low heat. If using a griddle, set it to 275°F. Place 2 slices of bread in the skillet with the butter side down.
- Stack cheeses on one piece of toast: cheddar, Havarti, then Gouda. Once the bread is golden brown, close the sandwich with the crisp sides on the outside.
- Continue cooking until the bread is a rich golden brown, flipping once and pressing down lightly to help the bread stick to the cheese. Total cooking time should be 5-6 minutes. Keep the heat on medium-low for the bread to toast slowly, allowing the cheese to fully melt and adhere to the bread.
- Once you see the cheese has melted and the breads are browned, remove to a plate and cut in half diagonally to serve. Repeat with the next sandwich.
Nutrition
Notes
Tried this recipe?
Let us know how it was!
Maya Patel, Community Manager & Adaptation Specialist
I’ve spent the past five years working in community-focused nutrition, passionate about making low-carb eating accessible to everyone regardless of cultural background. With certification in cross-cultural nutrition counseling, I help people adapt healthy eating approaches while preserving their cherished food traditions.
My journey began as a community outreach coordinator when I noticed how nutrition advice often ignored people’s cultural food practices. This frustrated me—why should someone abandon their grandmother’s recipes to be healthy? I started developing ways to adapt traditional dishes from different cultures to fit therapeutic nutrition goals, helping hundreds of families integrate low-carb principles without losing their culinary heritage.
As a second-generation Indian-American, this is deeply personal. I’ve balanced my family’s food traditions with modern nutrition research, especially when adopting a low-carb approach to manage my PCOS. That experience taught me that sustainable health changes must honor who you are and where you come from.
My “inclusive wellness” philosophy is straightforward: there’s no one-size-fits-all approach to healthy eating. Whether developing vegetarian keto adaptations for traditional Indian flavors or creating community spaces for sharing cultural recipe modifications, I believe everyone deserves respect and support in their wellness journey.
When I’m not facilitating online discussions or testing cultural adaptations in my Portland kitchen, I work with clay in my pottery studio or volunteer with local community gardens. I believe growing food together strengthens both community bonds and our connection to nourishing ingredients.
At Low Carb Recipe Journal, I ensure our community remains welcoming for readers from all backgrounds while developing practical ways to adapt recipes for different cultural preferences and dietary needs. My goal is making low-carb eating culturally celebratory, not restrictive.